Have you ever found yourself at home on a rainy day or cooped up in the winter during a blizzard. This is the perfect opportunity for you to do some baking! I can’t say that I have done any of this on my own. Actually, the baking part, I have had no part in. My job is to assist in decorating. So if you have any questions on the baking part, I apologize but I don’t have any advice for you. I recommend that you find a five star recipe, and gather all the supplies that you may need before you begin. One thing I do know about baking is that it is a lot of work and time consuming. Remember to be patient and wait for things to cool before you actually start decorating.
The Gingerbread House


The Sea Shell CakeThe Gingerbread House
For this project you could buy a simple box kit but what’s the fun in that!? Before Brigid came over to work on the gingerbread house she found a recipe for making gingerbread. She made the batch at her house before coming over. We also began to plan dimensions for the house. You can find dimensions on the internet or books from Barnes and Nobles. Since this was our first one we figured we would go for a basic rectangular shaped home. This requires a little bit of math and thinking. We also made sure we had a small knife to use as a cutting tool for our windows and doors.


As you can see from this image we had cut out all the windows and doors before putting up the walls. We also needed a baking board which you can get at any local party supply story to attach our house to. In order to get the walls to stands together you need to have frosting ready to use as a glue substitute. While the frosting hardens you need items such as soup cans to support the walls.

While we waited for the walls to firm up we began working on the roof. We used necco wafers as shingles. To get them to stay on the roof we again used the frosting as a glue substitute.

Once the house was strong enough we attached the roof using the same techniques. If you look inside the window you can see that we made curtains!

Our house was finally complete once we attached a chimney, shutters and a door. The door was made by attaching peppermint candies to a piece of gingerbread. The shutters were made with gingerbread pieces decorated with melted colored chocolates. The chimney was made to match the foundation. This look was created with pebble looking chocolates. We had a personal landscaper, Alicia, design a skating rink with rock candy. She also created a front walk with swirly twislers. The bushes in the front are Hershey kisses dipped in colored chocolate. Take a look at the flower boxes in front of the windows. The boxes were made from liquorish. The flowers, and also the door handle were made out of dots. The snow man, as well as the snow on the roof was made from fondant. See how creative you get! Too beautiful to eat! The dogs thought differently…….
 |
| Hershey & Boston in the crate after destroying our gingerbread house! |
 |
| Don't worry, the snowman survived! Note to self and to all of you… Never leave a gingerbread house unattended unless you have it in a safe location away from the animals. And no, a high counter is not considered a safe place! |
When planning our seashell cake we decided to do a circular cake with two tiers. Before Brigid and I got together, she baked the two tiers at home. She also made the frosting. I was in charge of making the fondant and any decorations that were to go on the cake. When we both finished our assigned task we got together to make our first cake!

Most people do not like the taste of fondant so I decided to look for an alternative recipe that might taste better. This is the recipe that I found.
4 cups of mini marshmallows (about ½ of a 16-ounce bag)
4 cups of powdered sugar (1lb)
2 tablespoons of water
Food Coloring of choice
This is a very easy recipe and it tastes much better than the boxed fondant. Make sure your working in a clean area with clean hands. First you want to dust your work area with powdered sugar. Place all your marshmallows in a large microwave safe bowl with the water. Put in the microwave on high for 1 minute. Stir the marshmallows. If any marshmallows are still unmelted put it back in the microwave for about 30 seconds and stir again. Once all the marshmallows are melted and well stirred a little at a time add the powdered sugar and stir well. Continue until you have finished stirring all the powdered sugar in. The mixture will be very sticky and lumpy but do not be discouraged. Next knead the fondant like dough. Roll it into a ball. You can store this if you wrap it well and keep it in the refrigerator. Do not add food coloring until the very end. You have to knead the food coloring in – this does take some time.
For the seashell cake we rolled the fondant. You can roll it to about ¼ to ½ an inch thick. Before putting it on the cake we used a layer of frosting underneath for better taste and to seal the fondant onto the cake.

The final product! Our cake was very heavy so we used dowels to support the interior portion of the cake. To hide our imperfections we twisted some fondant into a rope like texture and placed it along the base of the cake and between the first and second layer. The white seashells are made from melted white chocolate and candy molds that you can either get from Michaels or AC Moore. The starfish, sand dollars and other colored shells were made from marzipan. You can buy this in a can and color it with food coloring. It is very easy to shape. Brigid topped the cake with some frosting flowers that she made. The pearls were made from small rolled pieces of fondant covered in edible shimmer powder. They were attached to the cake with frosting.
Cocoa Cones
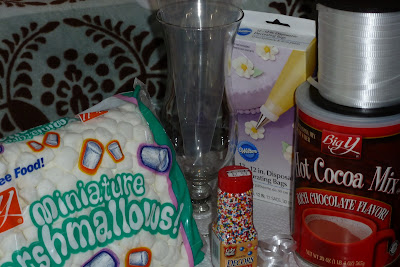
The supplies that you will need for the cocoa cone include:
Powder Cocoa Mix
Mini Marshmallows
Disposable frosting bags
Ribbon
Scissors


Sea Shell Mirror Update - I have ran into a bit of a glitch with the seashell mirror. I ran out of shells! The good news is that my in-laws are going to Maine next weekend and promised to bring home some more shells!
Chocolate Covered Pretzel Rods
I wanted to make something else for the bake sale at work so I decided that I would make chocolate dipped pretzel rods. This is a fun easy project that can be used for desserts, party favors or an item at a bake sale.
Supplies:
Pretzel Rods
Chocolate Wafers (You can get these in all sorts of colors at AC Moor and they are fairly inexpensive)
Sprinkles
Treat Bags
Twist Ties
Ribbon
Scissors
Wax Paper
Tall Coffee Mug
Cookie Tray
 When I started this project I had all of the supplies except the wax paper. You can use foil instead if you don't have wax paper on hand. I also didn't have any twist ties so at the end when I was tying up the treat bags I made sure to tie it very tight so that the pretzels wouldn't go stale.

Begin by filling a tall coffee mug with chocolate wafers and microwave for about 30 seconds. After 30 seconds stir the chocolate to loosen it up. Then put it back in the microwave for another 30 seconds repeating this process until the chocolate is completely melted. Make sure you follow the directions on the chocolate wafer bag. If you microwave the chocolate too long it becomes very chalky rather than liquidy. Be careful because the coffee mug will get very hot. Make sure you use an oven mit. Later you will be thanking me for suggesting that you use a tall coffee mug because it is the perfect depth for making chocolate dipped pretzel rods.


Then I put them on display in a basket for whatever event I am using them for. (If I don't plan on using them that day I put them in the fridge so the chocolate doesn't melt.) This makes a very delicious and creative snack.
Cocoa Cones
The supplies that you will need for the cocoa cone include:
Powder Cocoa Mix
Mini Marshmallows
Disposable frosting bags
Ribbon
Scissors

I usually take a tall glass and put the disposable frosting bag in it to stand it up.

I then add the powder cocoa mix. Usually about 2 servings. You can find the serving sizes on the side of your cocoa container.

Once I pour the cocoa in I then take a paper towel or clean unused paint brush and brush the excess cocoa of the sides of the plastic disposable frosting bag. The cocoa tends to stick because of the static. If you just leave it there it will be obvious against the white marshmallows. Once I am done cleaning the sides of the bag I add the mini marshmallows.

The easiest thing to do next is to seal the bag with a twist tie. Unfortunately I didn't have any today so I just tied it with ribbon. Some alternative ideas to do here is to use colored marshmallows or add chocolate chips or some other candy to jazz it up a bit. Since these are just for a bake sale I tried to keep it as priceless as possible with hopes to make a profit off of it for the bake sale which benefits the resident counsel at our nursing home. After you seal the bag with a twist tie, add some ribbon (and curl it) or add a beautiful bow that will make it look really elegent. You can also add a hot cocoa recipe to it or attach a tag that says thank you if you are making it as a party favor.

This is what your final product should look like - or even better if you added extra candy toppings or a pretty bow.

Sea Shell Mirror Update - I have ran into a bit of a glitch with the seashell mirror. I ran out of shells! The good news is that my in-laws are going to Maine next weekend and promised to bring home some more shells!
Chocolate Covered Pretzel Rods
I wanted to make something else for the bake sale at work so I decided that I would make chocolate dipped pretzel rods. This is a fun easy project that can be used for desserts, party favors or an item at a bake sale.
Supplies:
Pretzel Rods
Chocolate Wafers (You can get these in all sorts of colors at AC Moor and they are fairly inexpensive)
Sprinkles
Treat Bags
Twist Ties
Ribbon
Scissors
Wax Paper
Tall Coffee Mug
Cookie Tray


Next, dip the pretzel rod into the melted chocolate but not covering the entire rod. After dipping the pretzel in chocolate you can lay it on a wax covered (or foil covered in my case) cookie sheet.


Add the sprinkles to the pretzels as soon as possible otherwise they will not stick to the choocolate if it is dry. As an alternative for decorating the pretzels you can drizzle a contrasting colored chocolate onto the pretzel.

Depending on the weather outside you can leave the chocolate dipped pretzels out and once the chocolate cools it will harden within a half an hour. When I made these chocolates it was very humid and muggy so to speed up the process I put the pretzels on a shelf in the fridge for 5 minutes.

At the very end I put two pretzels in each treat bag, tied them with a twist tie and ribbon and then curled the ribbon.

Then I put them on display in a basket for whatever event I am using them for. (If I don't plan on using them that day I put them in the fridge so the chocolate doesn't melt.) This makes a very delicious and creative snack.